Best Practices
Introduction
This guide should help you to make sure you are following our best practices and writing tests that are more resilient.
Testing philosophy
Test user-visible behavior
Automated tests should verify that the application code works for the end users, and avoid relying on implementation details such as things which users will not typically use, see, or even know about such as the name of a function, whether something is an array, or the CSS class of some element. The end user will see or interact with what is rendered on the page, so your test should typically only see/interact with the same rendered output.
Make tests as isolated as possible
Each test should be completely isolated from another test and should run independently with its own local storage, session storage, data, cookies etc. Test isolation improves reproducibility, makes debugging easier and prevents cascading test failures.
In order to avoid repetition for a particular part of your test you can use before and after hooks. Within your test file add a before hook to run a part of your test before each test such as going to a particular URL or logging in to a part of your app. This keeps your tests isolated as no test relies on another. However it is also ok to have a little duplication when tests are simple enough especially if it keeps your tests clearer and easier to read and maintain.
import { test } from '@playwright/test';

test.beforeEach(async ({ page }) => {
  // Runs before each test and signs in each page.
  await page.goto('https://github.com/login');
  await page.getByLabel('Username or email address').fill('username');
  await page.getByLabel('Password').fill('password');
  await page.getByRole('button', { name: 'Sign in' }).click();
});

test('first', async ({ page }) => {
  // page is signed in.
});

test('second', async ({ page }) => {
  // page is signed in.
});
You can also reuse the signed-in state in the tests with setup project. That way you can log in only once and then skip the log in step for all of the tests.
Avoid testing third-party dependencies
Only test what you control. Don't try to test links to external sites or third party servers that you do not control. Not only is it time consuming and can slow down your tests but also you cannot control the content of the page you are linking to, or if there are cookie banners or overlay pages or anything else that might cause your test to fail.
Instead, use the Playwright Network API and guarantee the response needed.
await page.route('**/api/fetch_data_third_party_dependency', route => route.fulfill({
  status: 200,
  body: testData,
}));
await page.goto('https://example.com');
Testing with a database
If working with a database then make sure you control the data. Test against a staging environment and make sure it doesn't change. For visual regression tests make sure the operating system and browser versions are the same.
Best Practices
Use locators
In order to write end to end tests we need to first find elements on the webpage. We can do this by using Playwright's built in locators. Locators come with auto waiting and retry-ability. Auto waiting means that Playwright performs a range of actionability checks on the elements, such as ensuring the element is visible and enabled before it performs the click. To make tests resilient, we recommend prioritizing user-facing attributes and explicit contracts.
// 👍
page.getByRole('button', { name: 'submit' });
Use chaining and filtering
Locators can be chained to narrow down the search to a particular part of the page.
const product = page.getByRole('listitem').filter({ hasText: 'Product 2' });
You can also filter locators by text or by another locator.
await page
    .getByRole('listitem')
    .filter({ hasText: 'Product 2' })
    .getByRole('button', { name: 'Add to cart' })
    .click();
Prefer user-facing attributes to XPath or CSS selectors
Your DOM can easily change so having your tests depend on your DOM structure can lead to failing tests. For example consider selecting this button by its CSS classes. Should the designer change something then the class might change, thus breaking your test.
// 👎
page.locator('button.buttonIcon.episode-actions-later');
Use locators that are resilient to changes in the DOM.
// 👍
page.getByRole('button', { name: 'submit' });
Generate locators
Playwright has a test generator that can generate tests and pick locators for you. It will look at your page and figure out the best locator, prioritizing role, text and test id locators. If the generator finds multiple elements matching the locator, it will improve the locator to make it resilient and uniquely identify the target element, so you don't have to worry about failing tests due to locators.
Use codegen to generate locators
To pick a locator run the codegen command followed by the URL that you would like to pick a locator from.
- npm
- yarn
- pnpm
npx playwright codegen playwright.dev
yarn playwright codegen playwright.dev
pnpm exec playwright codegen playwright.dev
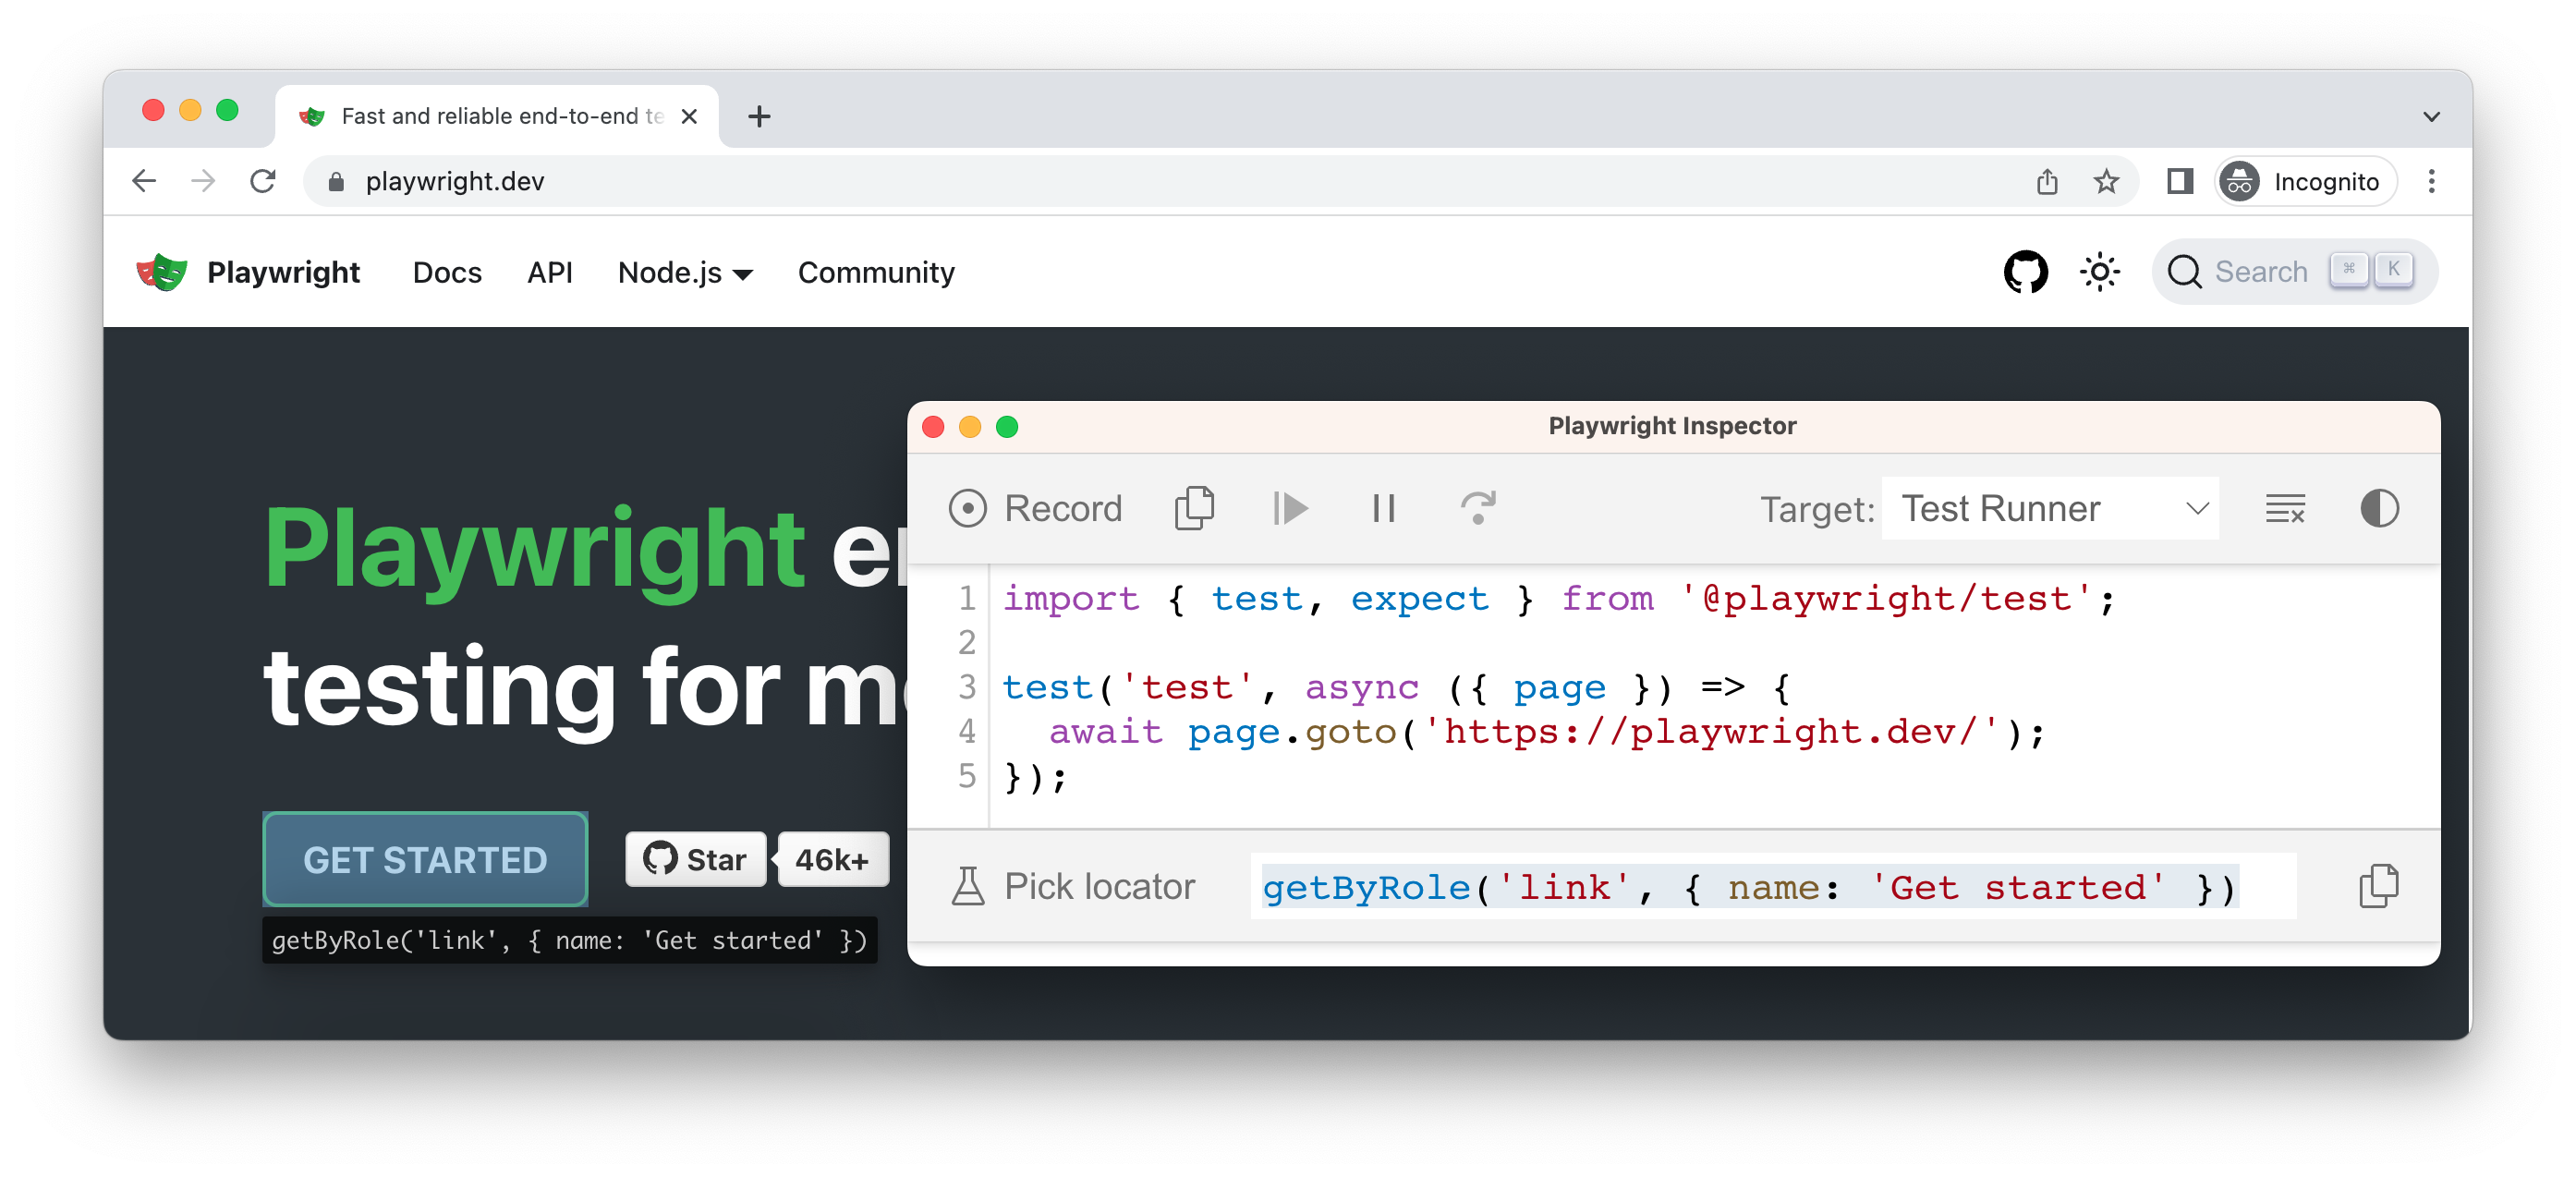
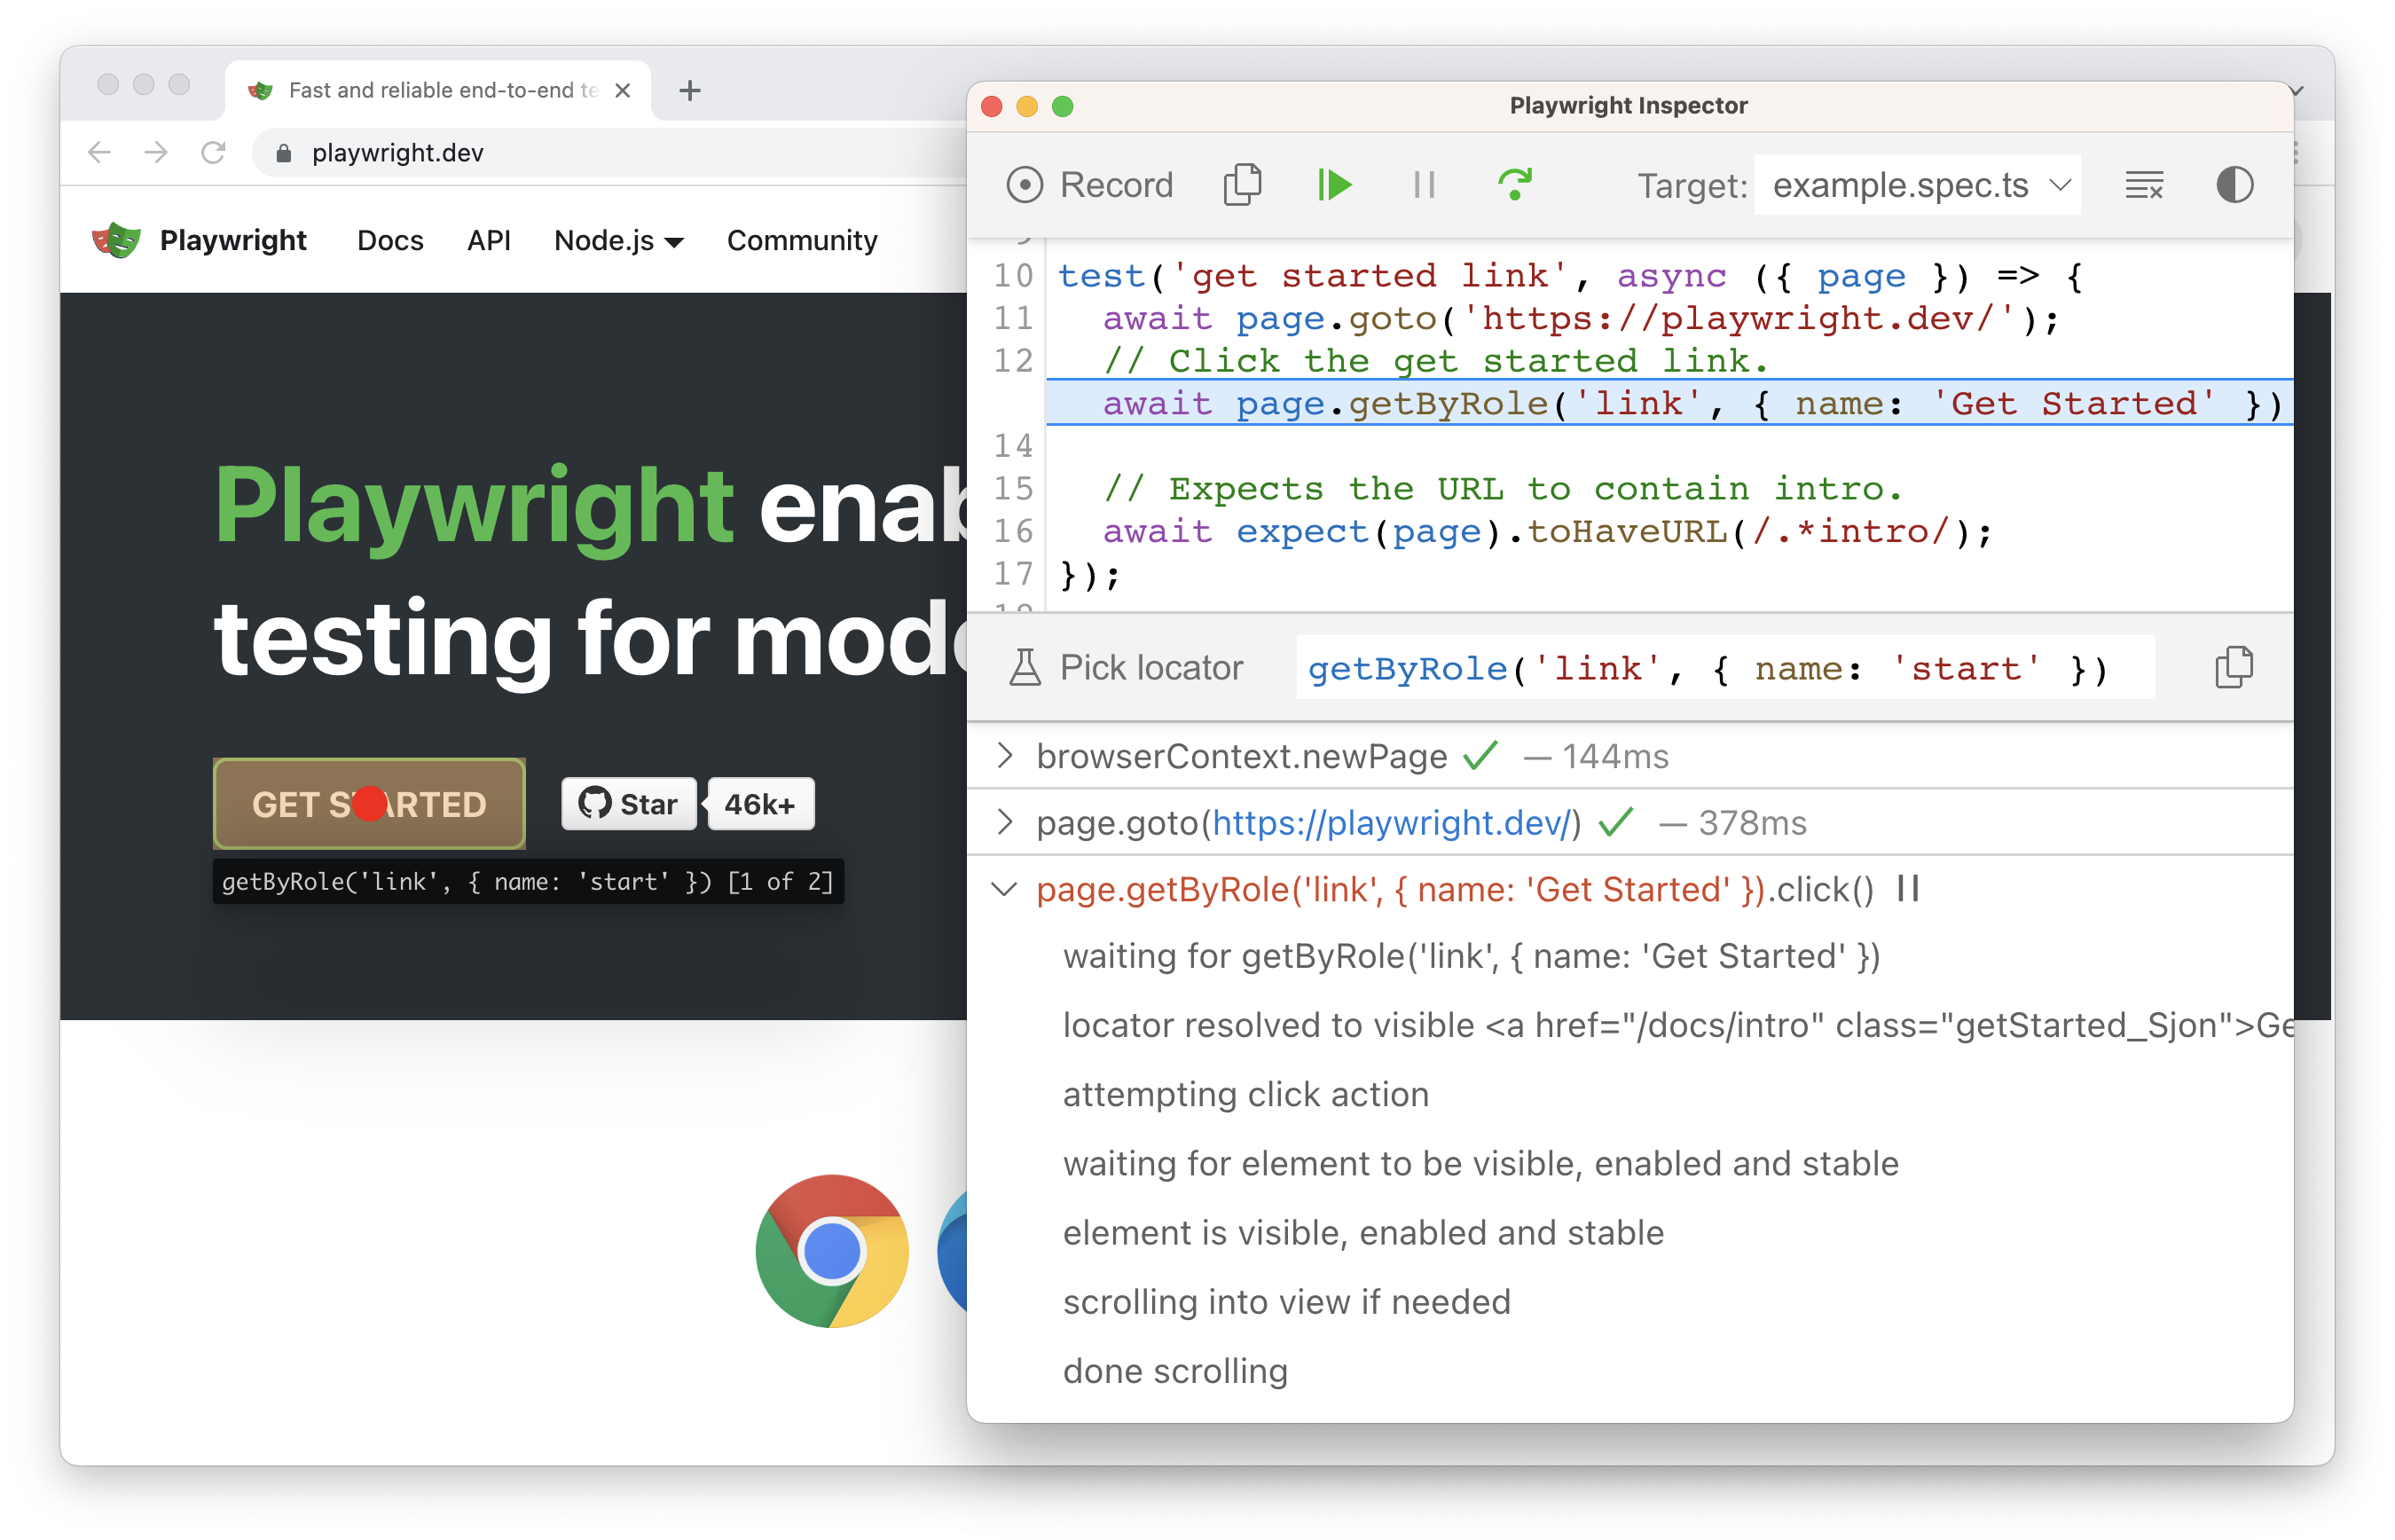
This will open a new browser window as well as the Playwright inspector. To pick a locator first click on the 'Record' button to stop the recording. By default when you run the codegen command it will start a new recording. Once you stop the recording the 'Pick Locator' button will be available to click.
You can then hover over any element on your page in the browser window and see the locator highlighted below your cursor. Clicking on an element will add the locator into the Playwright inspector. You can either copy the locator and paste into your test file or continue to explore the locator by editing it in the Playwright Inspector, for example by modifying the text, and seeing the results in the browser window.
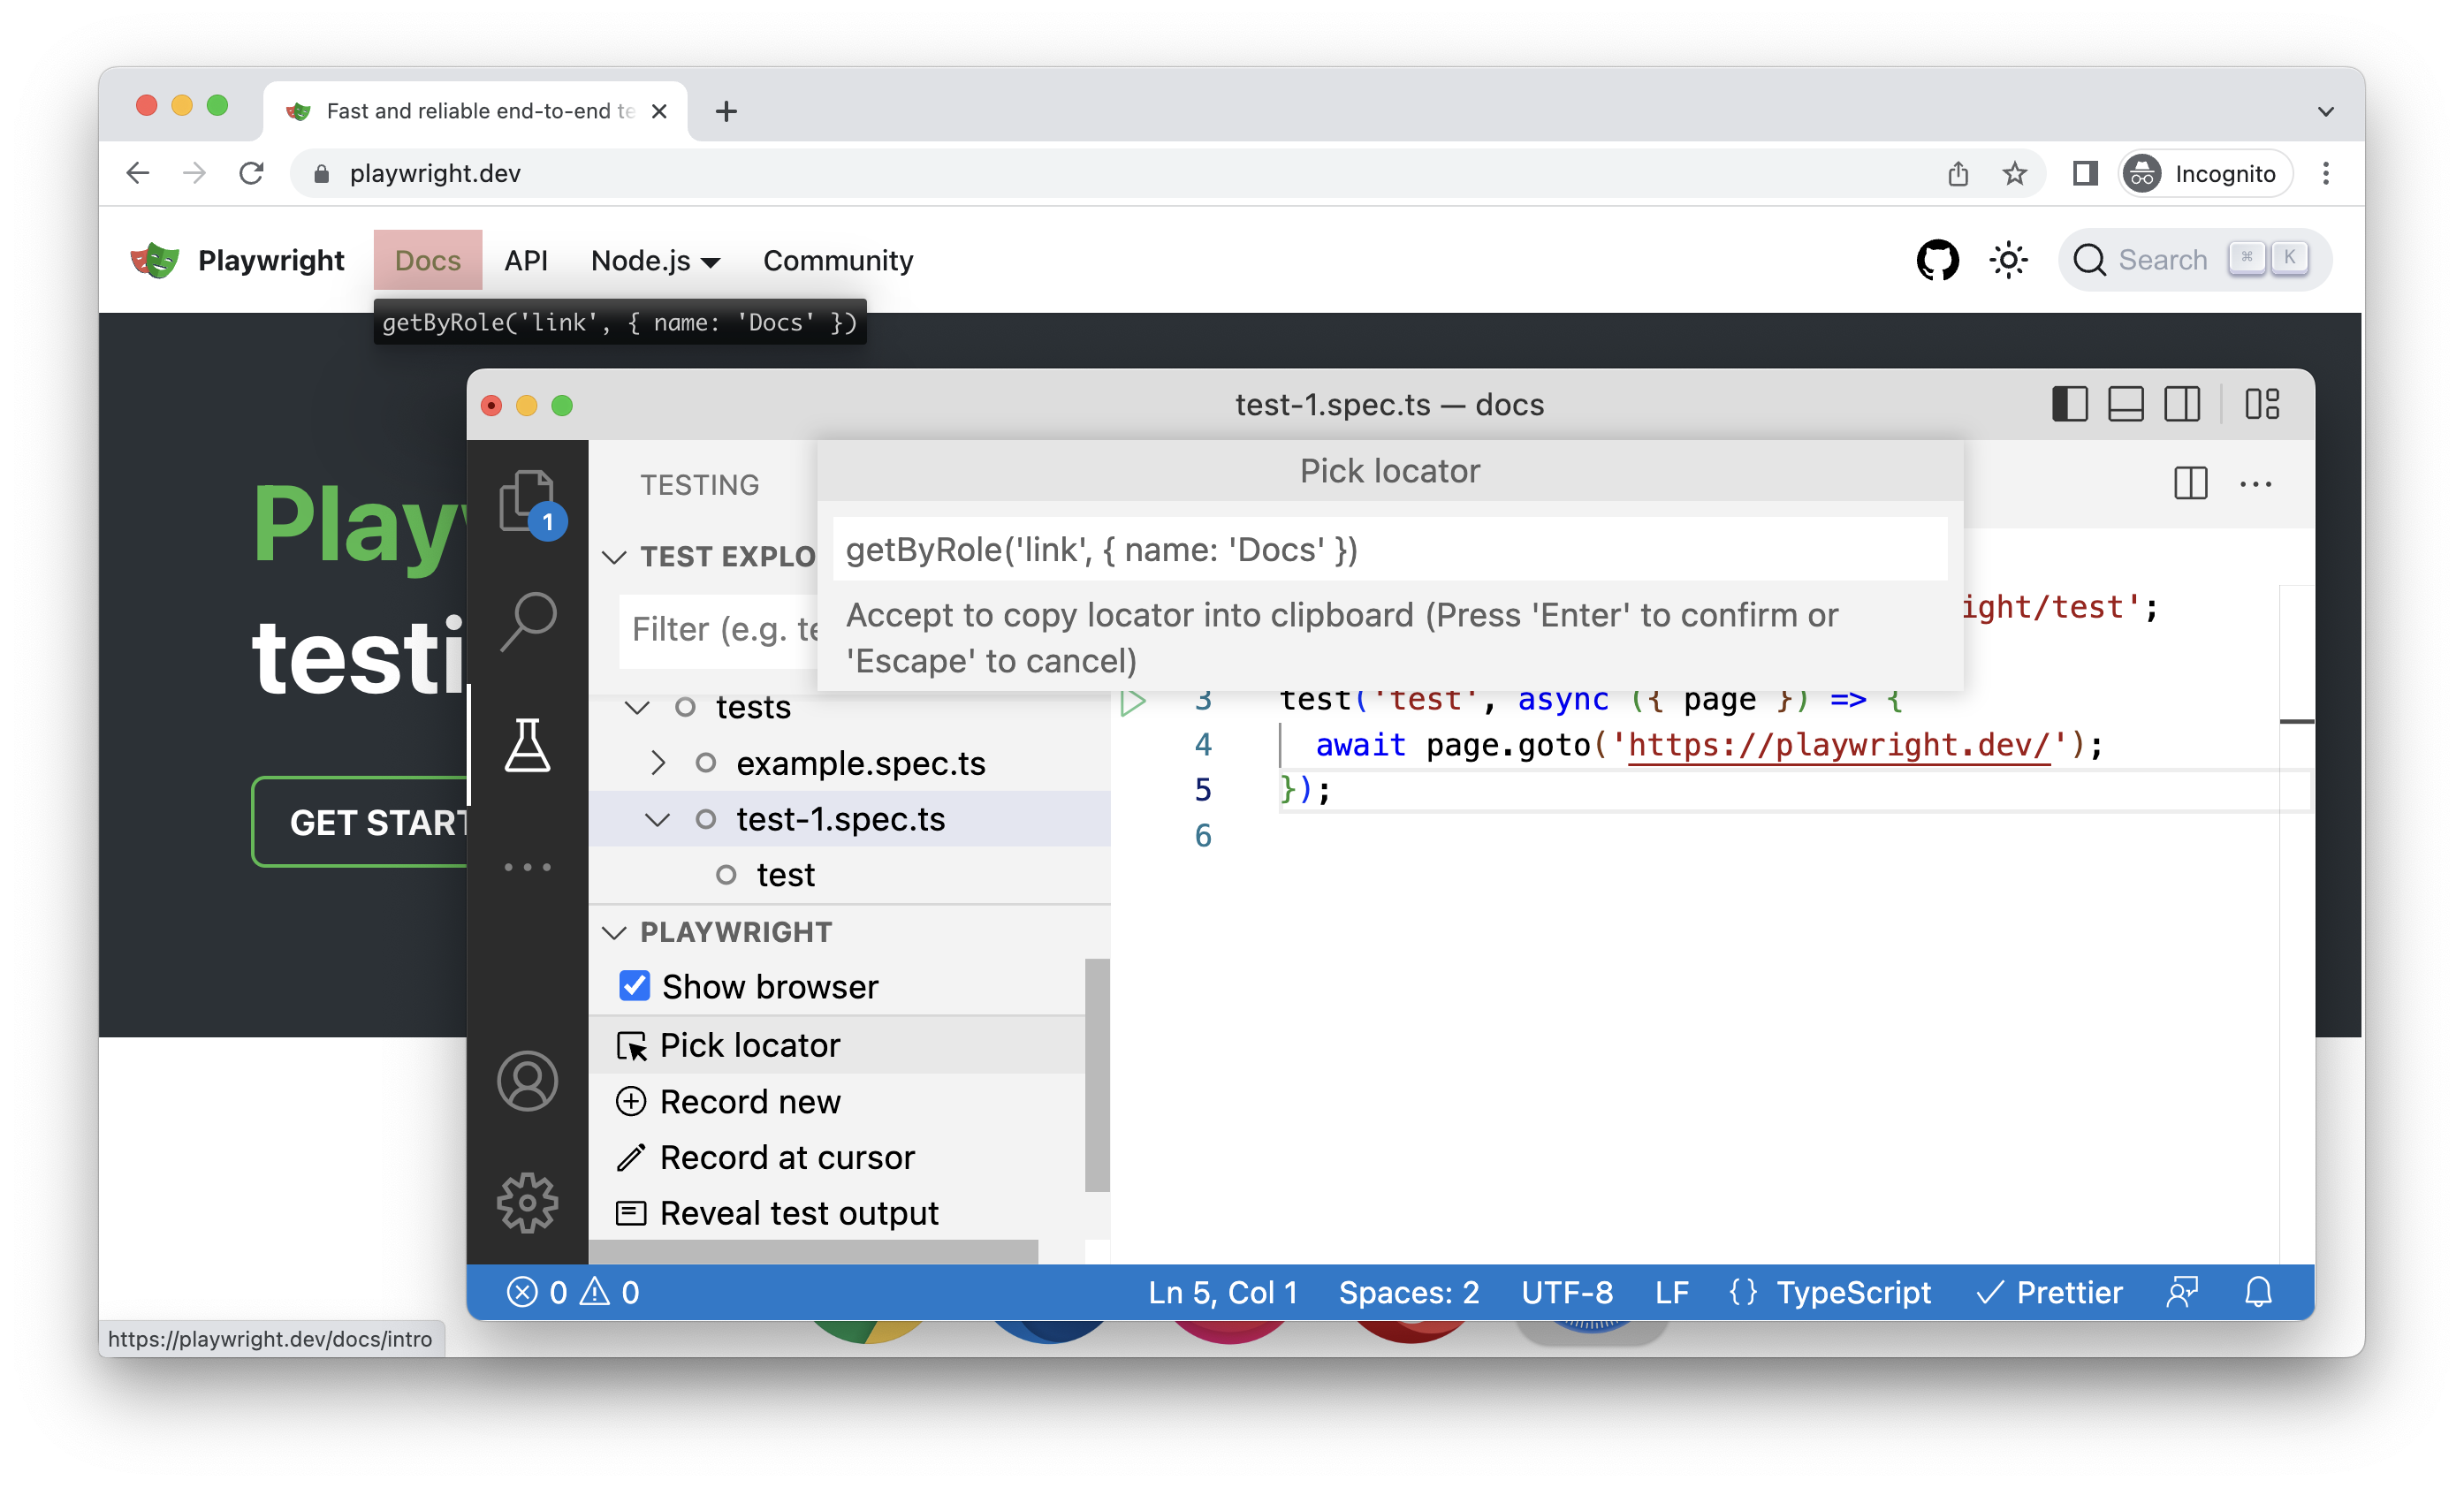
Use the VS Code extension to generate locators
You can also use the VS Code Extension to generate locators as well as record a test. The VS Code extension also gives you a great developer experience when writing, running, and debugging tests.
Use web first assertions
Assertions are a way to verify that the expected result and the actual result matched or not. By using web first assertions Playwright will wait until the expected condition is met. For example, when testing an alert message, a test would click a button that makes a message appear and check that the alert message is there. If the alert message takes half a second to appear, assertions such as toBeVisible() will wait and retry if needed.
// 👍
await expect(page.getByText('welcome')).toBeVisible();

// 👎
expect(await page.getByText('welcome').isVisible()).toBe(true);
Don't use manual assertions
Don't use manual assertions that are not awaiting the expect. In the code below the await is inside the expect rather than before it. When using assertions such as isVisible() the test won't wait a single second, it will just check the locator is there and return immediately.
// 👎
expect(await page.getByText('welcome').isVisible()).toBe(true);
Use web first assertions such as toBeVisible() instead.
// 👍
await expect(page.getByText('welcome')).toBeVisible();
Configure debugging
Local debugging
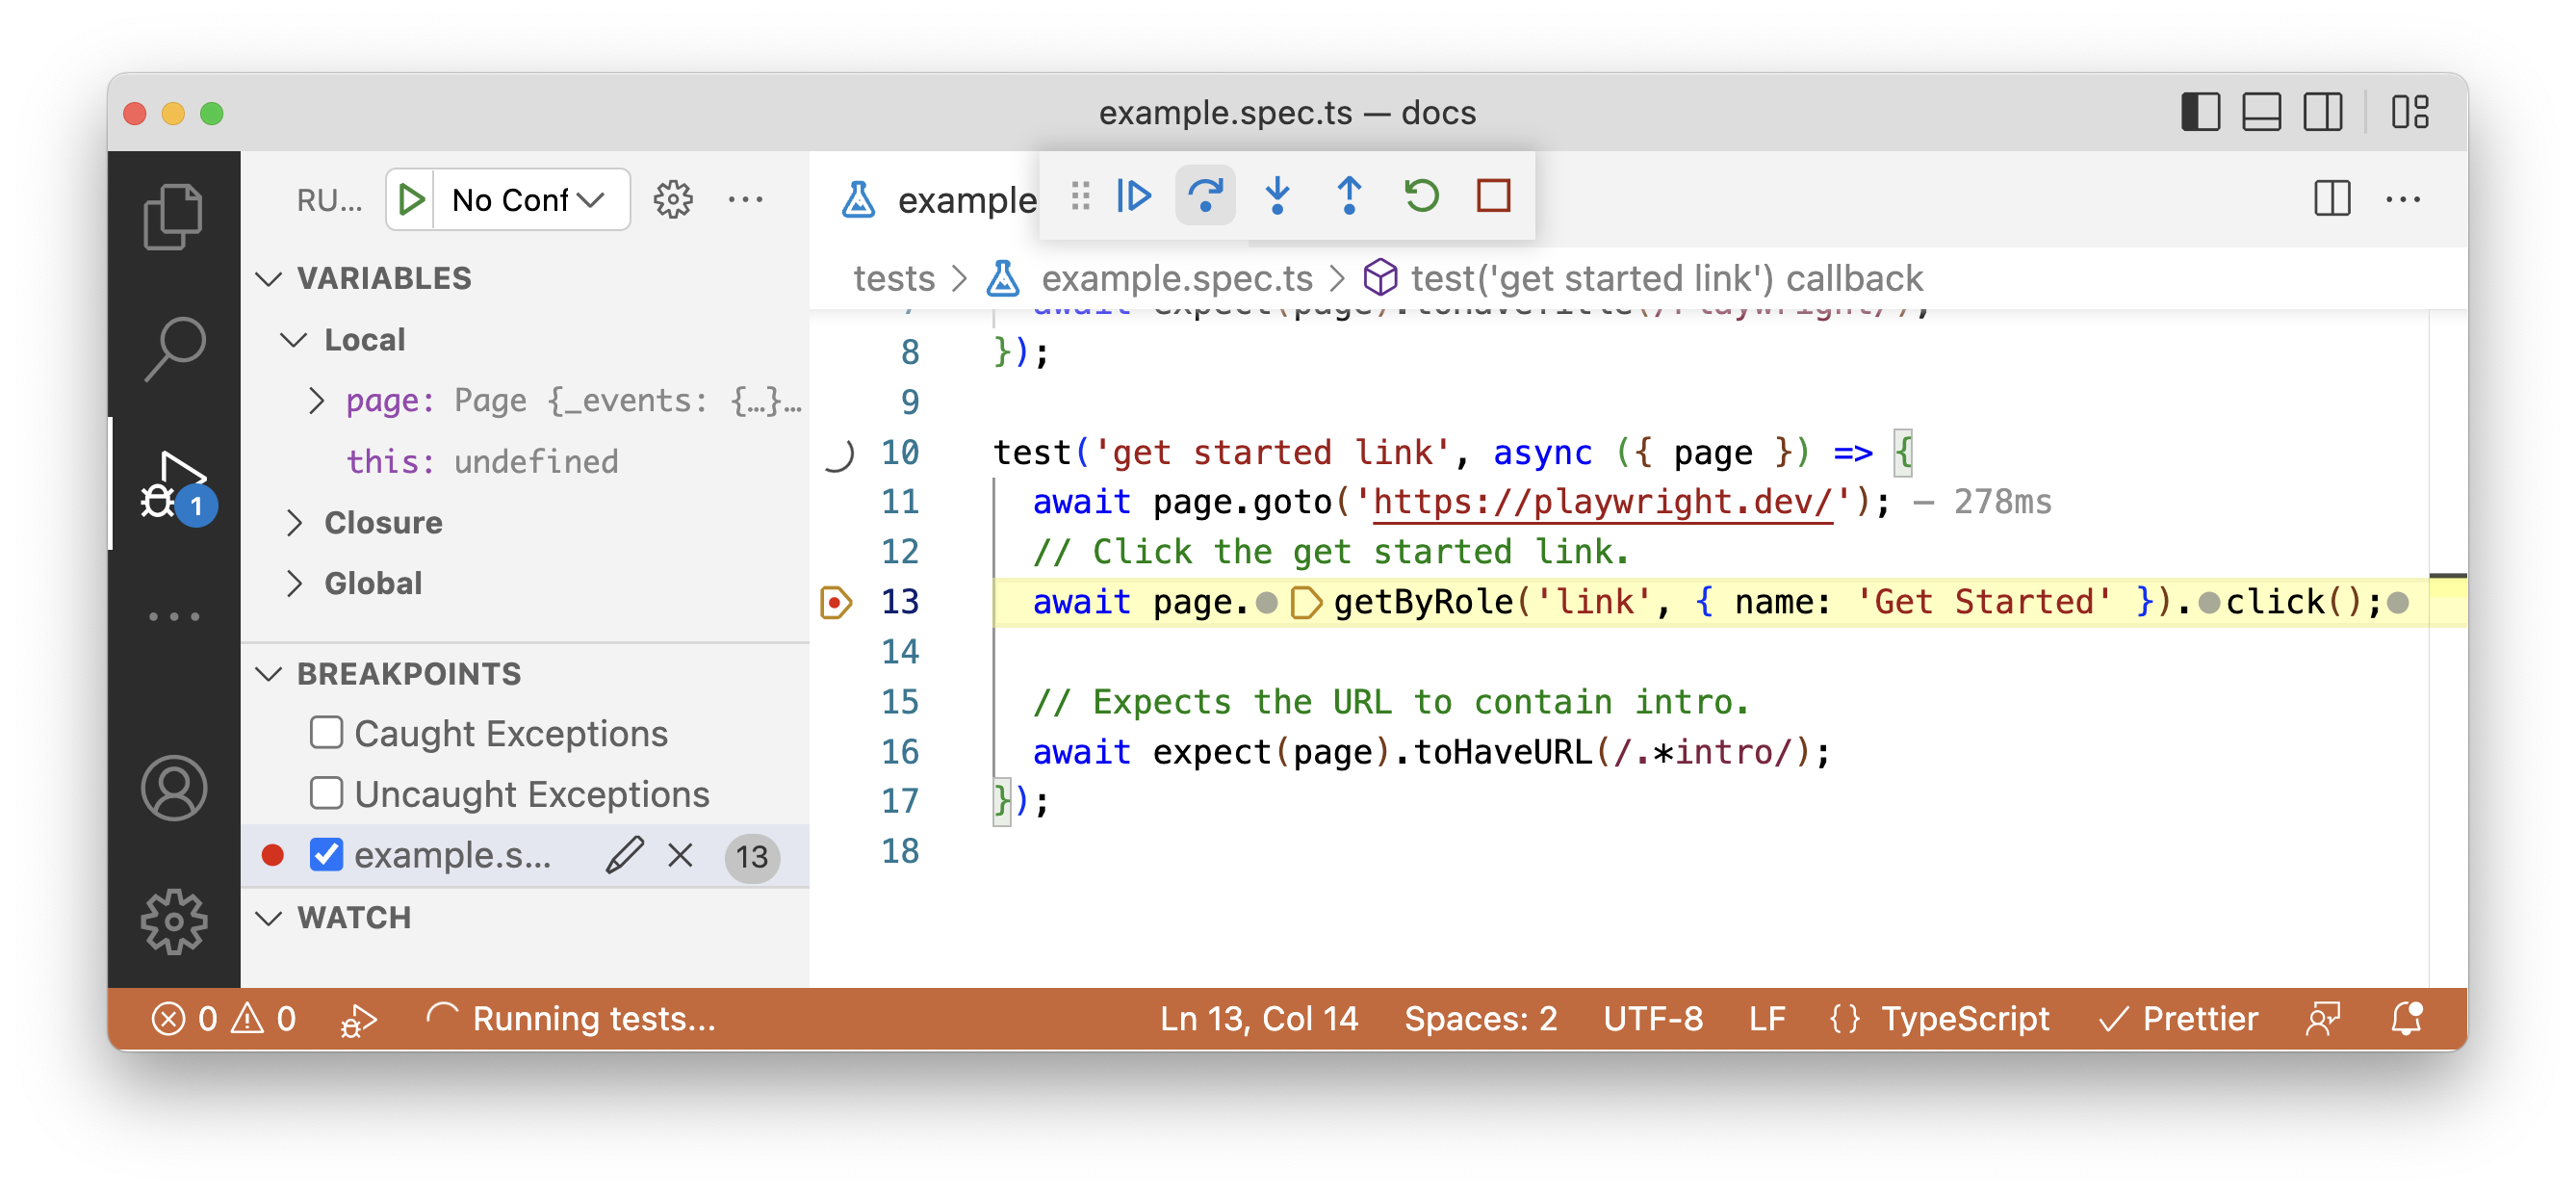
For local debugging we recommend you debug your tests live in VS Code by installing the VS Code extension. You can run tests in debug mode by right-clicking on the line next to the test you want to run which will open a browser window and pause at where the breakpoint is set.
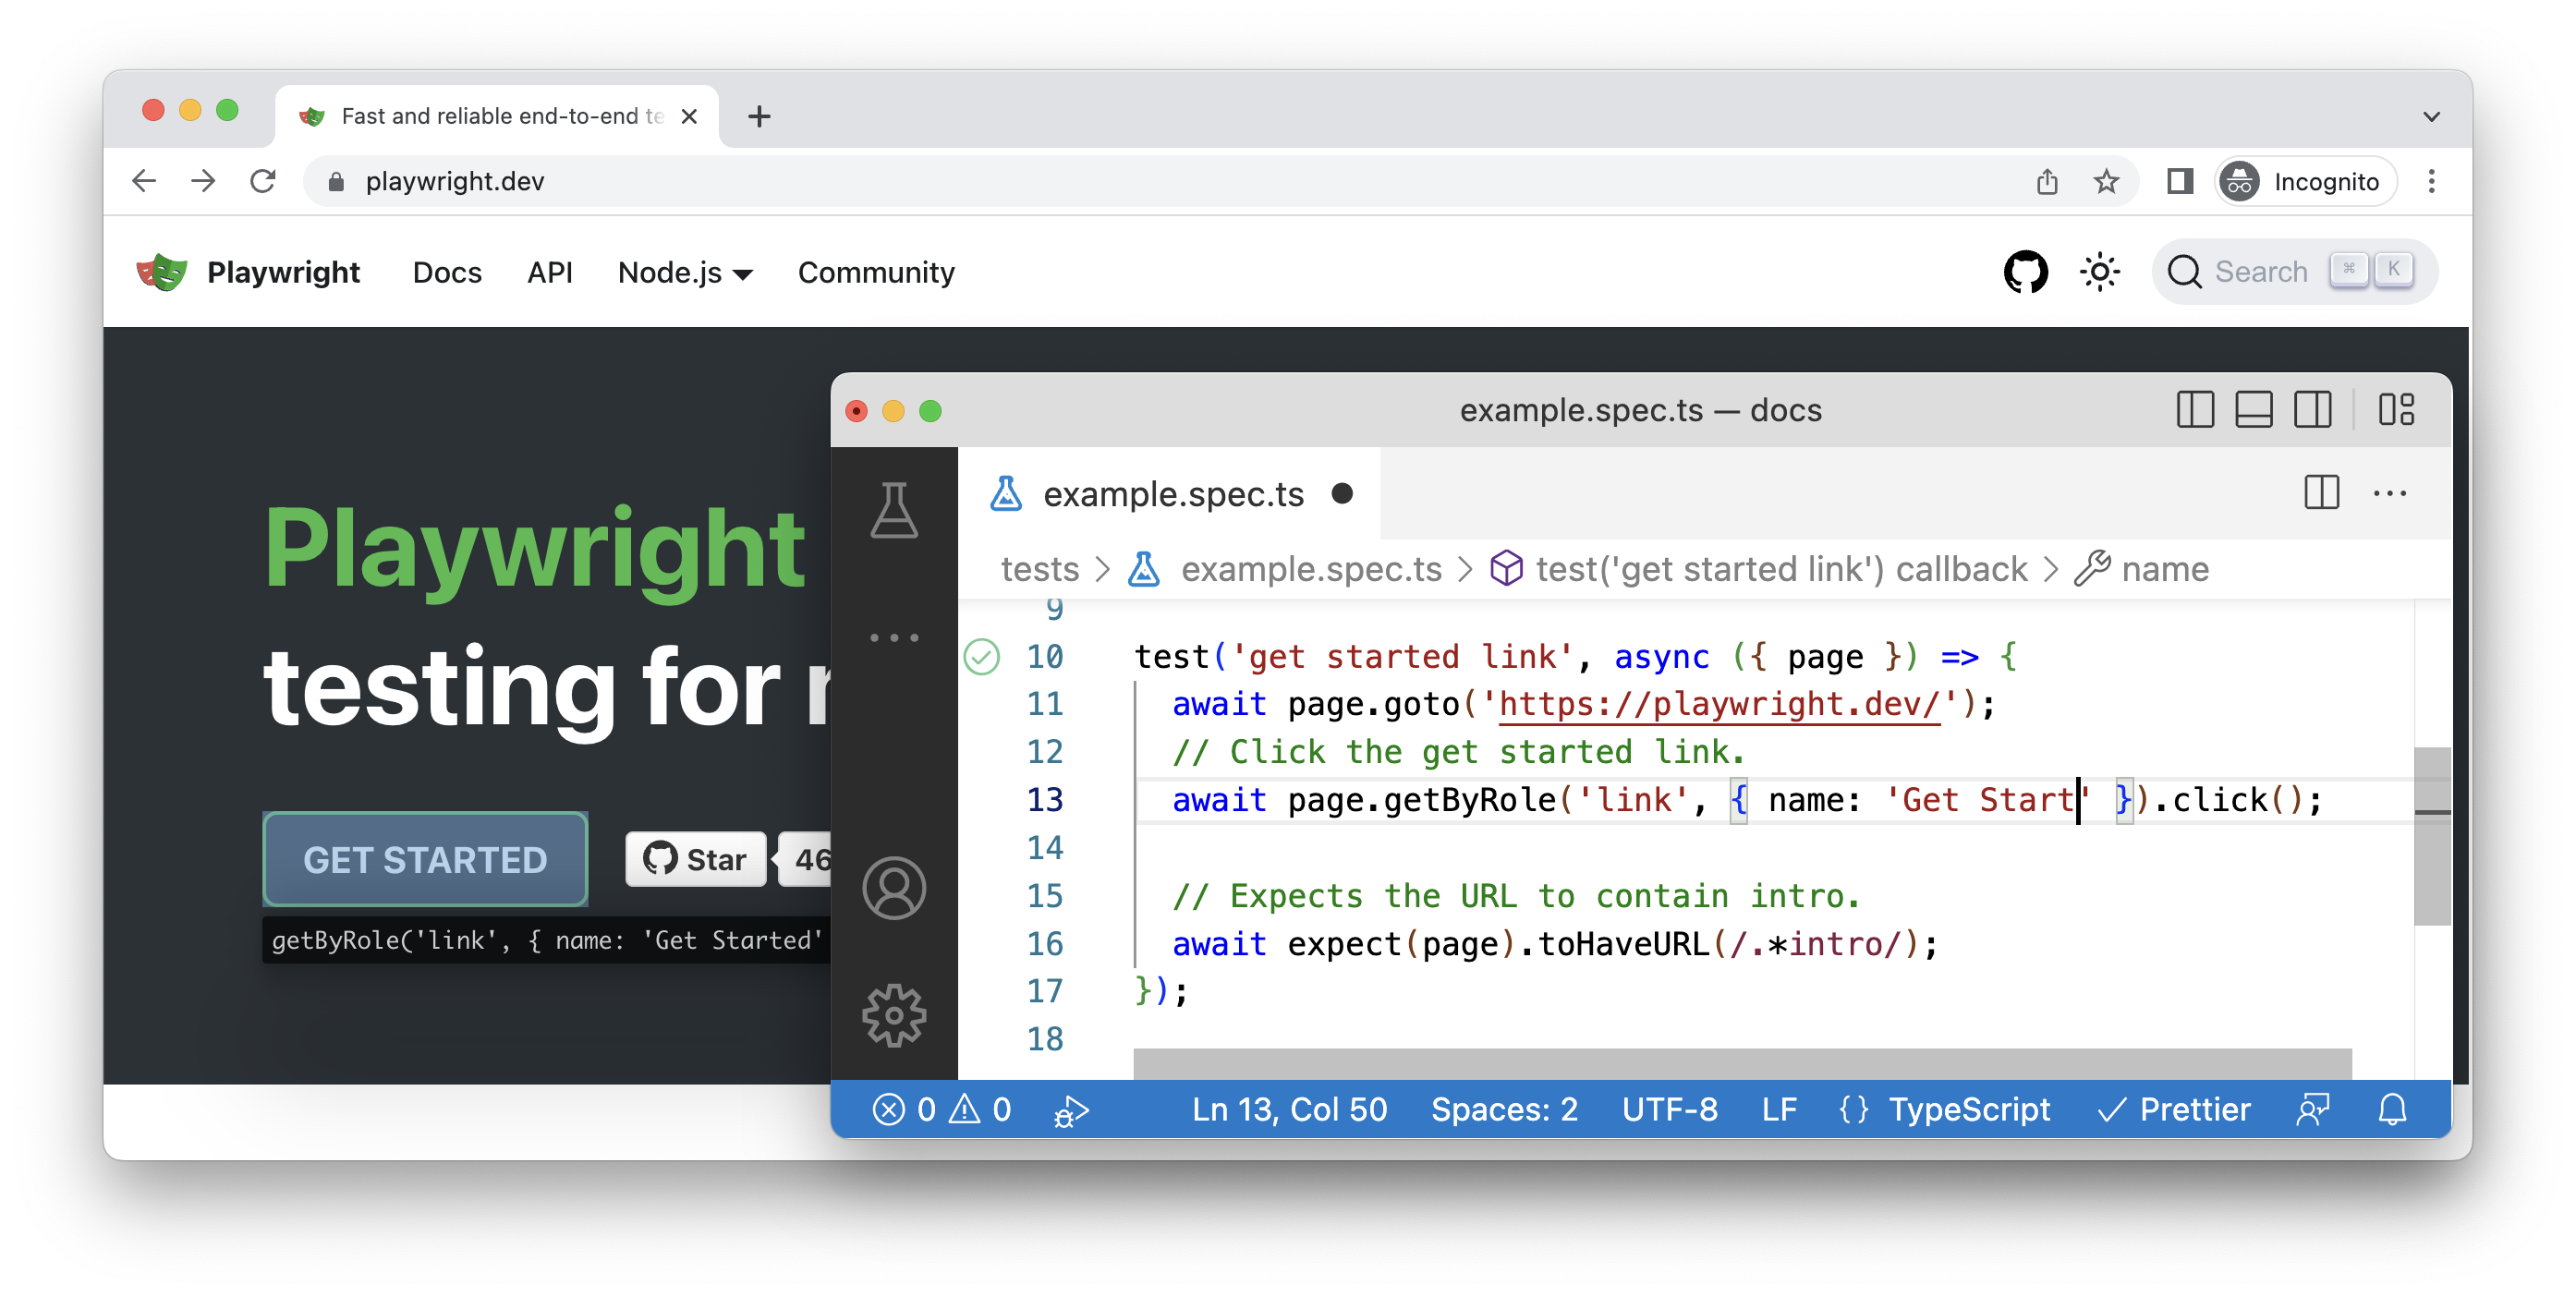
You can live debug your test by clicking or editing the locators in your test in VS Code which will highlight this locator in the browser window as well as show you any other matching locators found on the page.
You can also debug your tests with the Playwright inspector by running your tests with the --debug flag.
- npm
- yarn
- pnpm
npx playwright test --debug
yarn playwright test --debug
pnpm exec playwright test --debug
You can then step through your test, view actionability logs and edit the locator live and see it highlighted in the browser window. This will show you which locators match, how many of them there are.
To debug a specific test add the name of the test file and the line number of the test followed by the --debug flag.
- npm
- yarn
- pnpm
npx playwright test example.spec.ts:9 --debug
yarn playwright test example.spec.ts:9 --debug
pnpm exec playwright test example.spec.ts:9 --debug
Debugging on CI
For CI failures, use the Playwright trace viewer instead of videos and screenshots. The trace viewer gives you a full trace of your tests as a local Progressive Web App (PWA) that can easily be shared. With the trace viewer you can view the timeline, inspect DOM snapshots for each action using dev tools, view network requests and more.
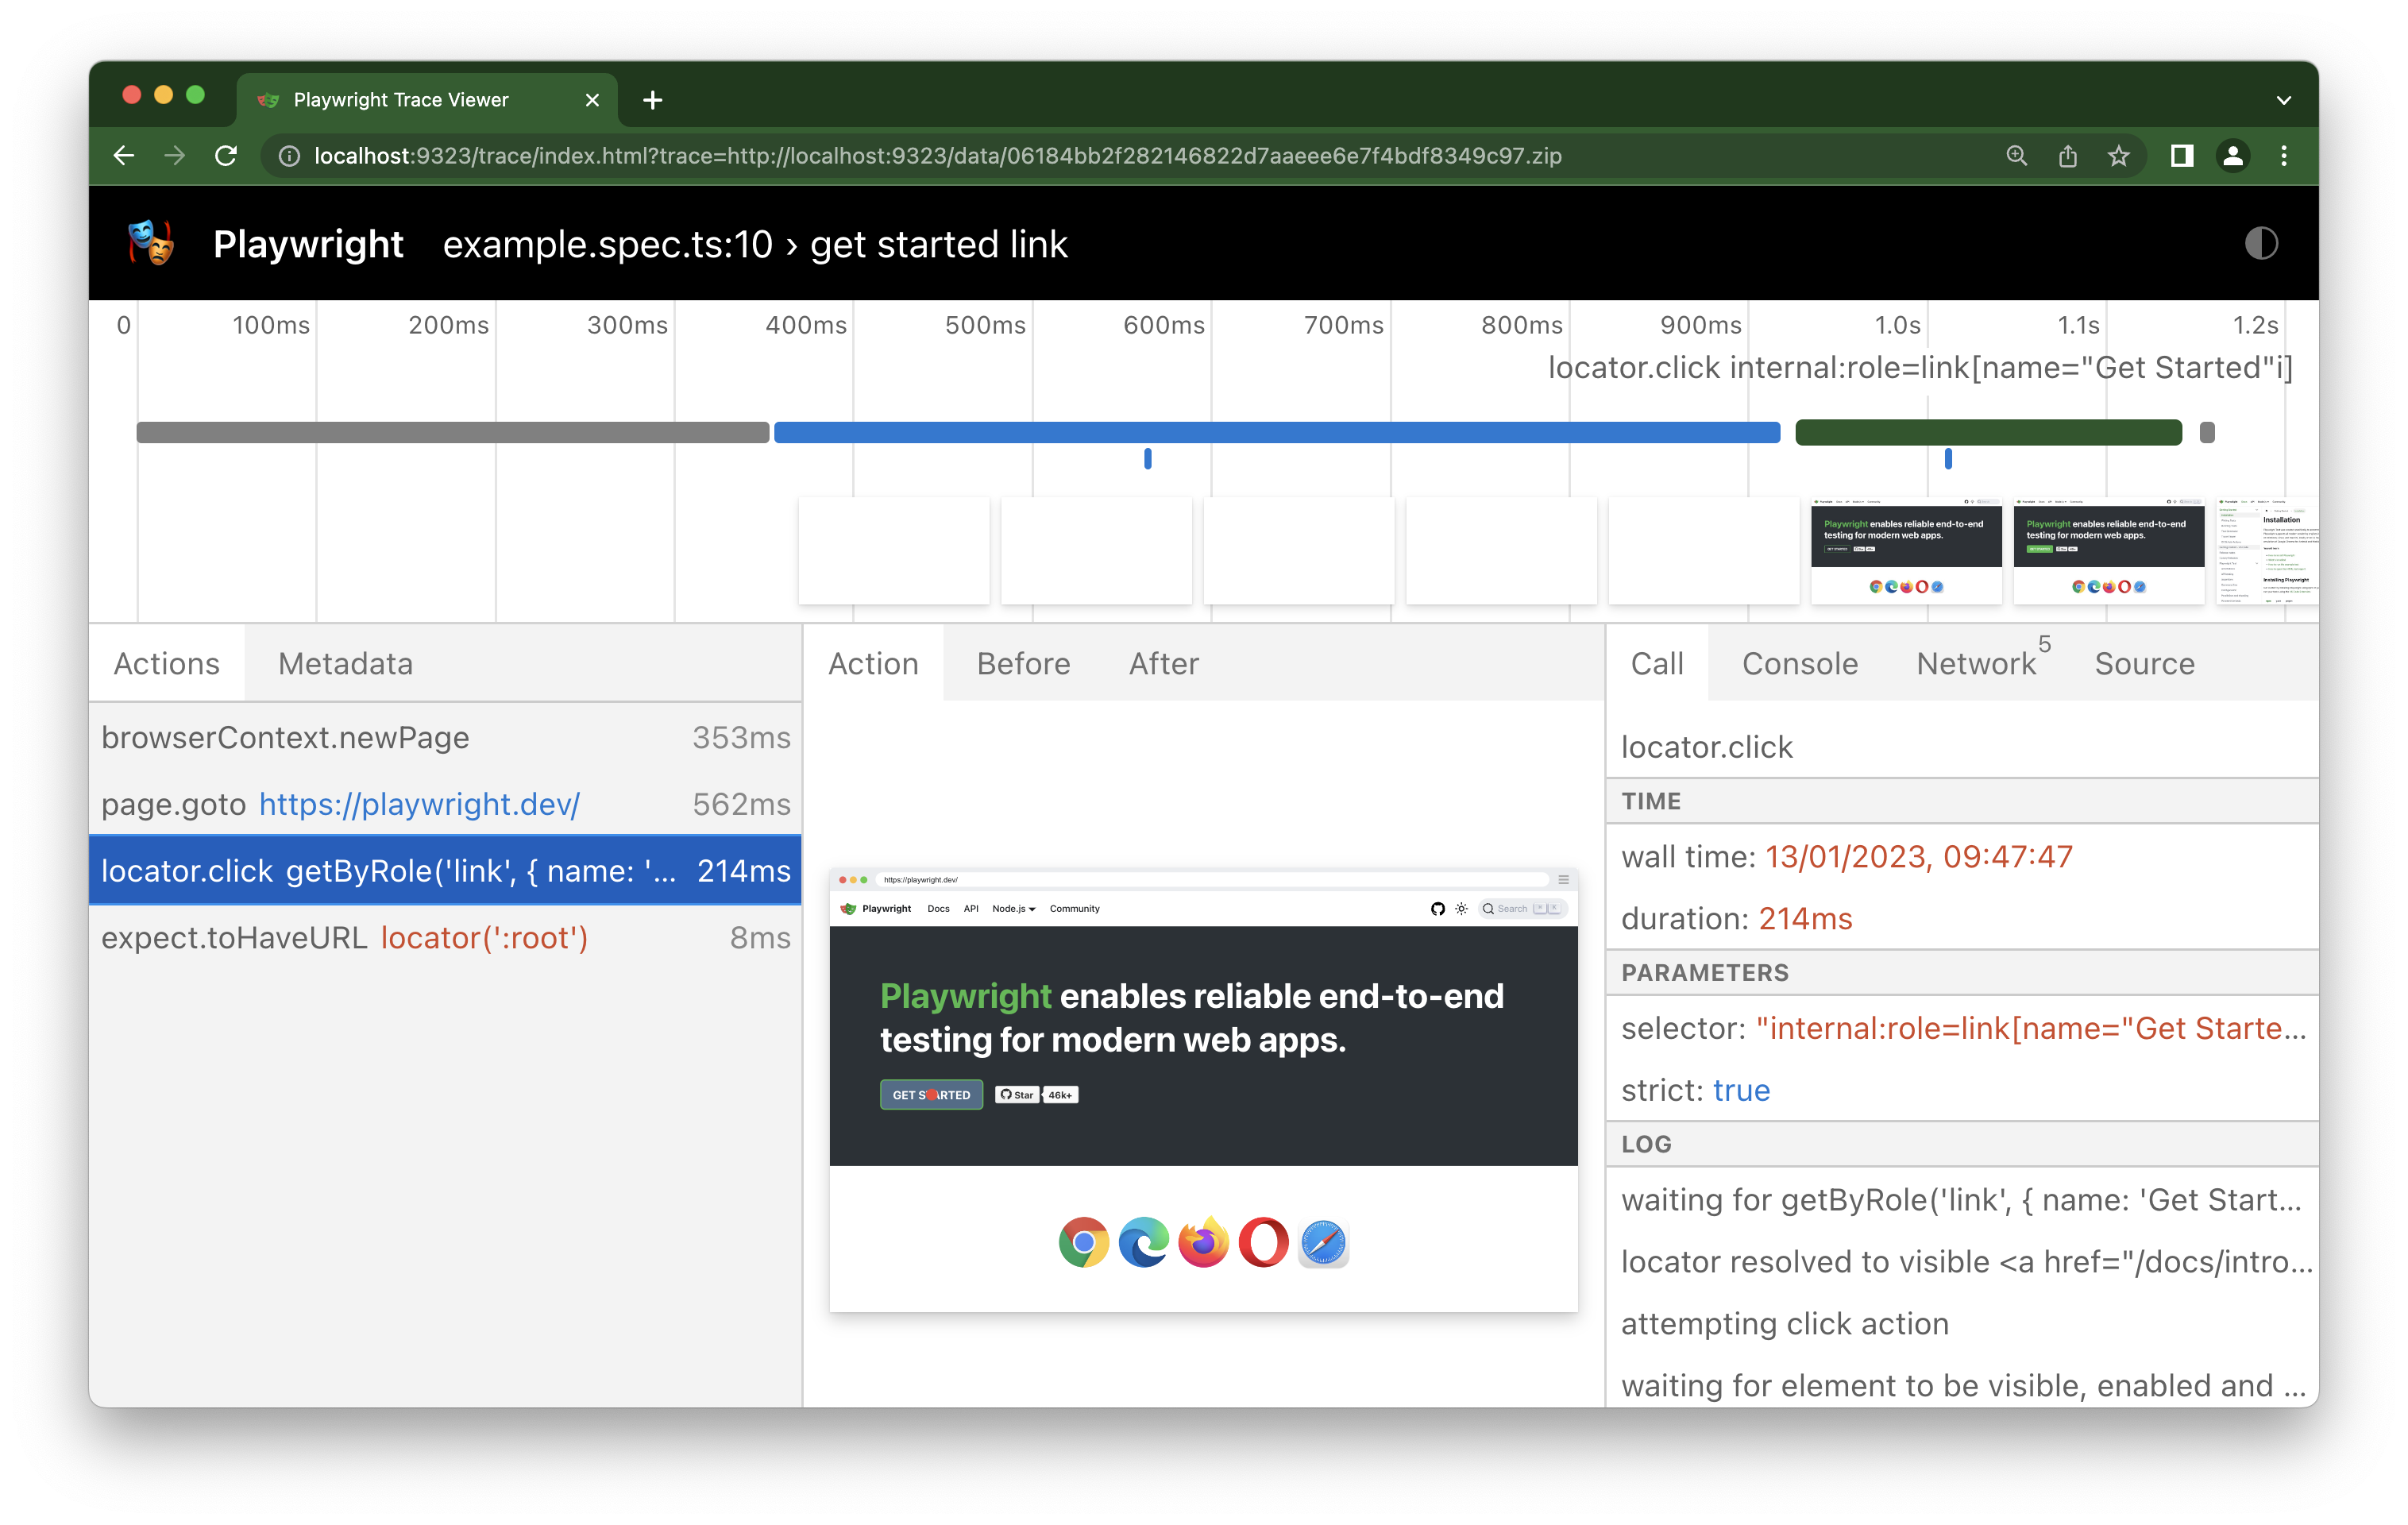
Traces are configured in the Playwright config file and are set to run on CI on the first retry of a failed test. We don't recommend setting this to on so that traces are run on every test as it's very performance heavy. However you can run a trace locally when developing with the --trace flag.
- npm
- yarn
- pnpm
npx playwright test --trace on
yarn playwright test --trace on
pnpm exec playwright test --trace on
Once you run this command your traces will be recorded for each test and can be viewed directly from the HTML report.
- npm
- yarn
- pnpm
npx playwright show-report
yarn playwright show-report
pnpm exec playwright show-report
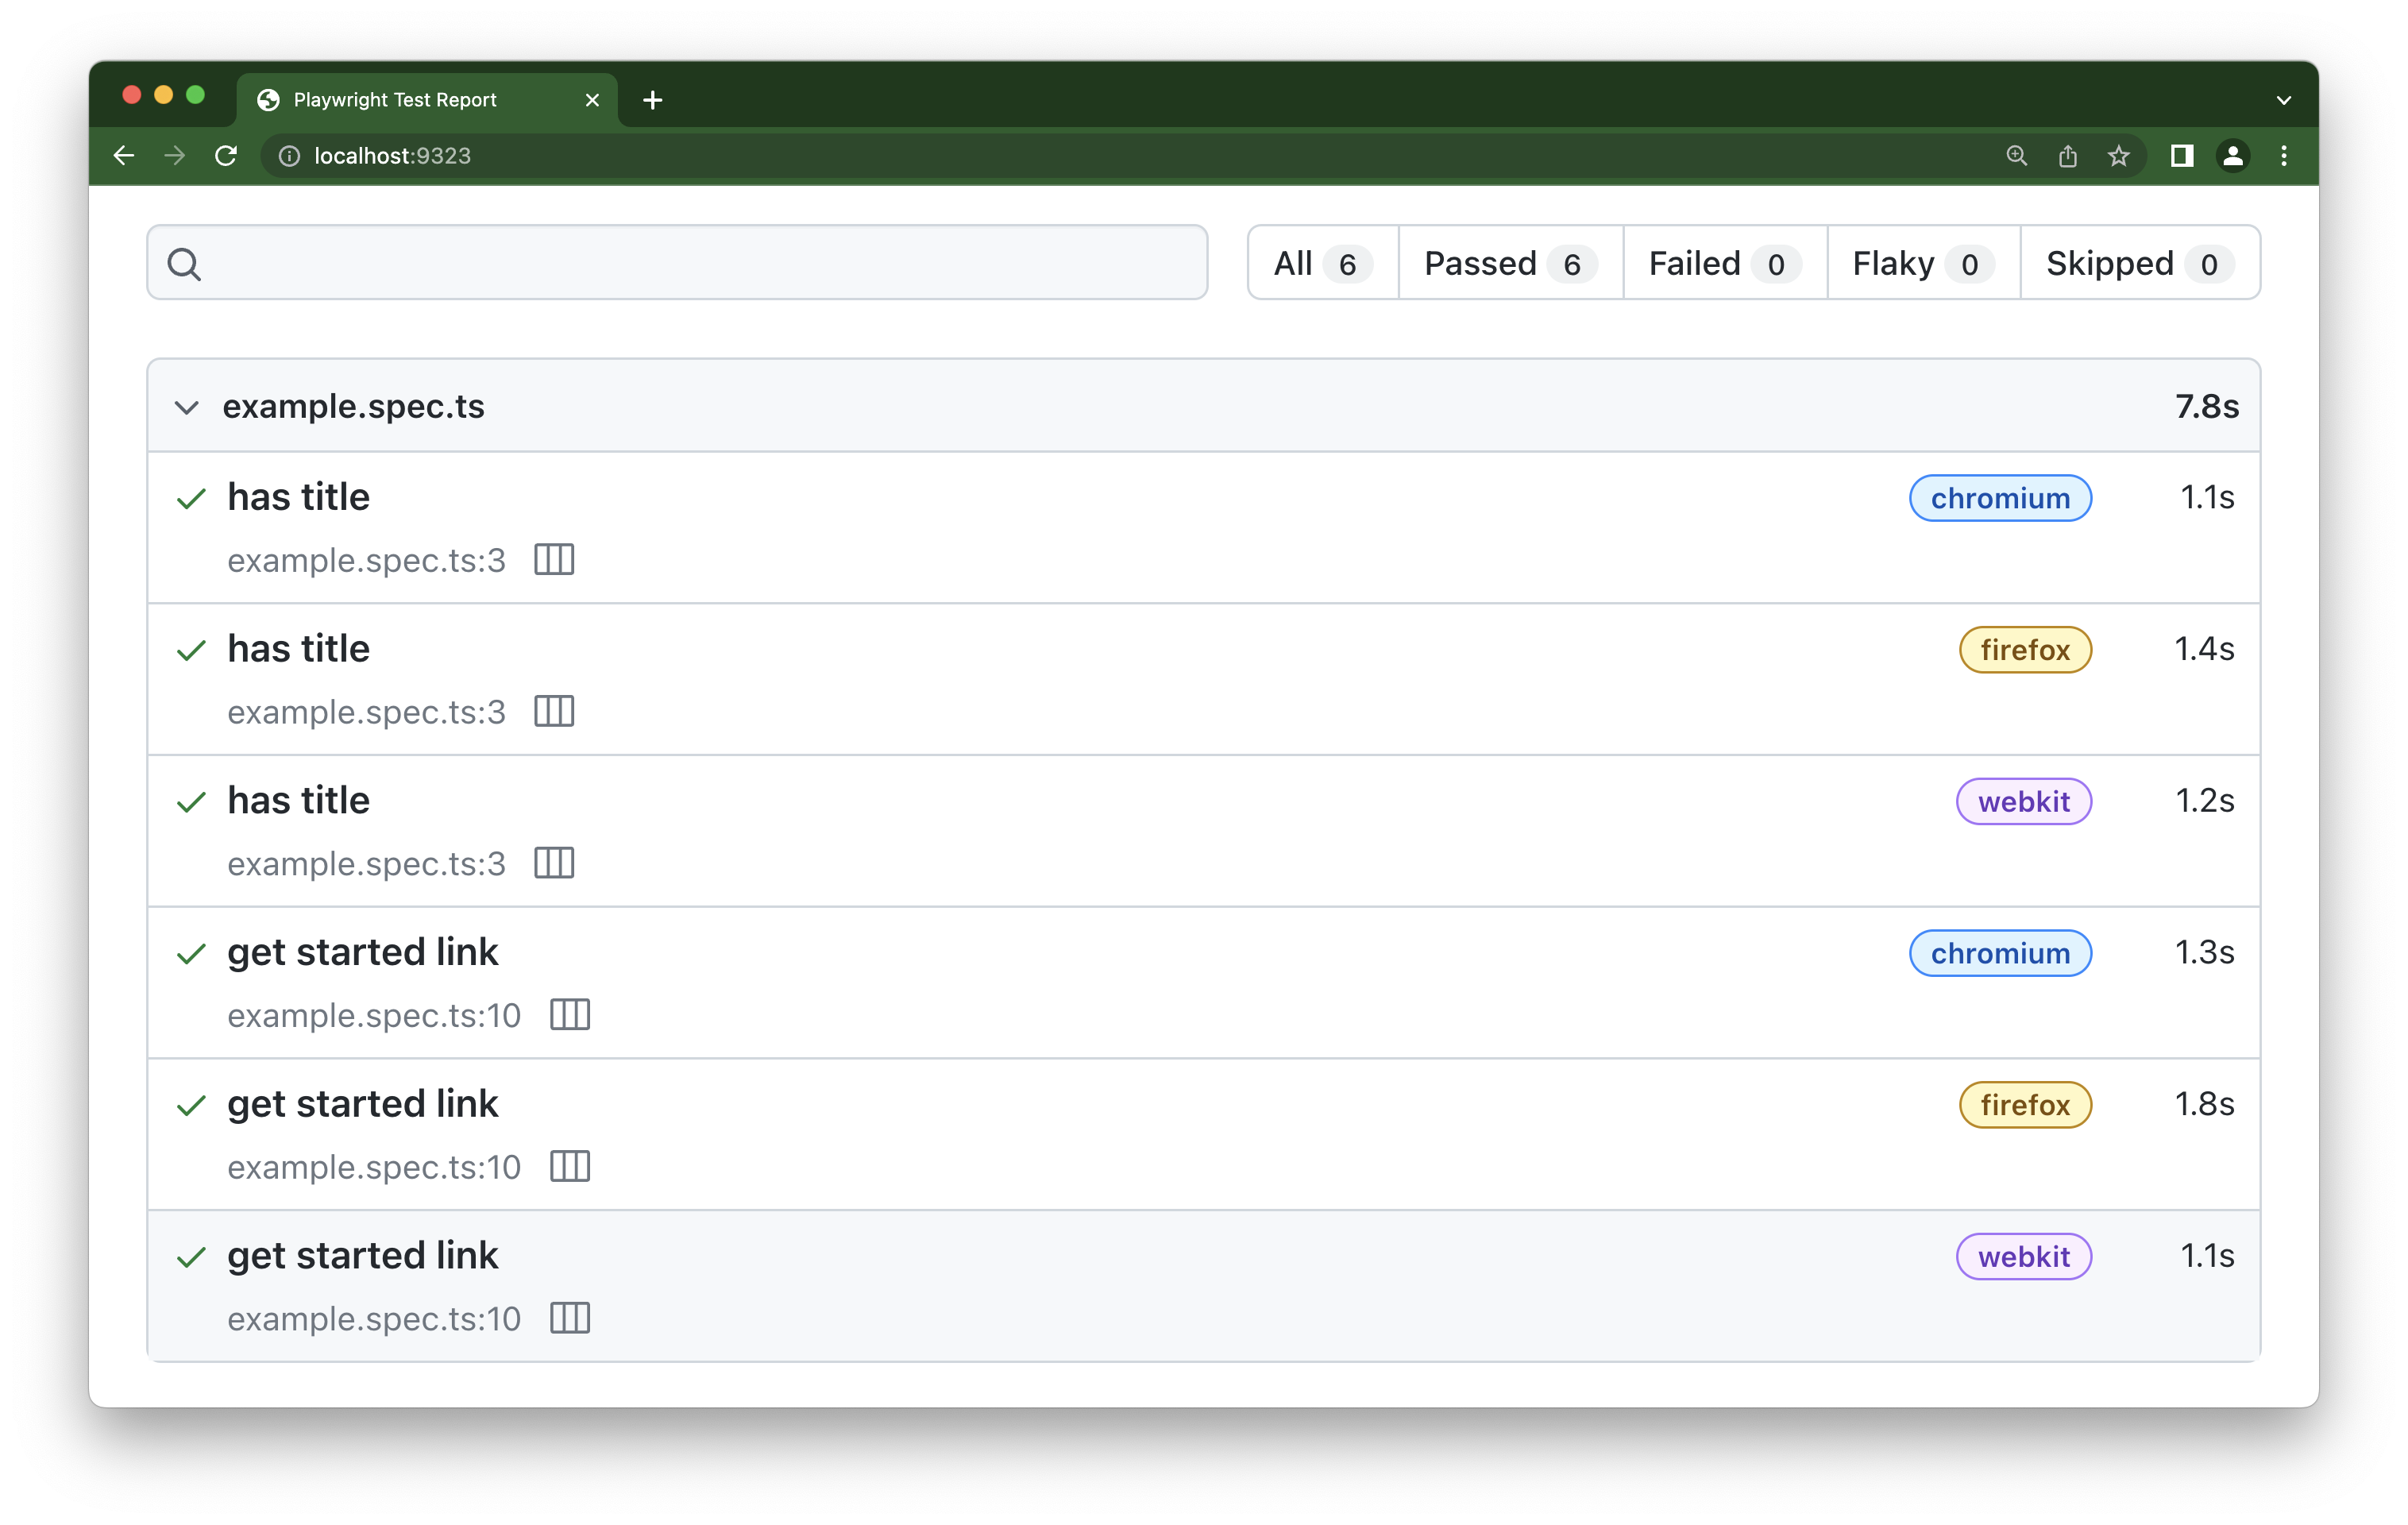
Traces can be opened by clicking on the icon next to the test file name or by opening each of the test reports and scrolling down to the traces section.

Use Playwright's Tooling
Playwright comes with a range of tooling to help you write tests.
- The VS Code extension gives you a great developer experience when writing, running, and debugging tests.
- The test generator can generate tests and pick locators for you.
- The trace viewer gives you a full trace of your tests as a local PWA that can easily be shared. With the trace viewer you can view the timeline, inspect DOM snapshots for each action, view network requests and more.
- The UI Mode lets you explore, run and debug tests with a time travel experience complete with watch mode. All test files are loaded into the testing sidebar where you can expand each file and describe block to individually run, view, watch and debug each test.
- TypeScript in Playwright works out of the box and gives you better IDE integrations. Your IDE will show you everything you can do and highlight when you do something wrong. No TypeScript experience is needed and it is not necessary for your code to be in TypeScript, all you need to do is create your tests with a
.tsextension.
Test across all browsers
Playwright makes it easy to test your site across all browsers no matter what platform you are on. Testing across all browsers ensures your app works for all users. In your config file you can set up projects adding the name and which browser or device to use.
import { defineConfig, devices } from '@playwright/test';

export default defineConfig({
  projects: [
    {
      name: 'chromium',
      use: { ...devices['Desktop Chrome'] },
    },
    {
      name: 'firefox',
      use: { ...devices['Desktop Firefox'] },
    },
    {
      name: 'webkit',
      use: { ...devices['Desktop Safari'] },
    },
  ],
});
Keep your Playwright dependency up to date
By keeping your Playwright version up to date you will be able to test your app on the latest browser versions and catch failures before the latest browser version is released to the public.
- npm
- yarn
- pnpm
npm install -D @playwright/test@latest
yarn add --dev @playwright/test@latest
pnpm install --save-dev @playwright/test@latest
Check the release notes to see what the latest version is and what changes have been released.
You can see what version of Playwright you have by running the following command.
- npm
- yarn
- pnpm
npx playwright --version
yarn playwright --version
pnpm exec playwright --version
Run tests on CI
Setup CI/CD and run your tests frequently. The more often you run your tests the better. Ideally you should run your tests on each commit and pull request. Playwright comes with a GitHub actions workflow so that tests will run on CI for you with no setup required. Playwright can also be setup on the CI environment of your choice.
Use Linux when running your tests on CI as it is cheaper. Developers can use whatever environment when running locally but use linux on CI. Consider setting up Sharding to make CI faster.
Optimize browser downloads on CI
Only install the browsers that you actually need, especially on CI. For example, if you're only testing with Chromium, install just Chromium.
# Instead of installing all browsers
npx playwright install --with-deps

# Install only Chromium
npx playwright install chromium --with-deps
This saves both download time and disk space on your CI machines.
Lint your tests
We recommend TypeScript and linting with ESLint for your tests to catch errors early. Use @typescript-eslint/no-floating-promises ESLint rule to make sure there are no missing awaits before the asynchronous calls to the Playwright API. On your CI you can run tsc --noEmit to ensure that functions are called with the right signature.
Use parallelism and sharding
Playwright runs tests in parallel by default. Tests in a single file are run in order, in the same worker process. If you have many independent tests in a single file, you might want to run them in parallel
import { test } from '@playwright/test';

test.describe.configure({ mode: 'parallel' });

test('runs in parallel 1', async ({ page }) => { /* ... */ });
test('runs in parallel 2', async ({ page }) => { /* ... */ });
Playwright can shard a test suite, so that it can be executed on multiple machines.
- npm
- yarn
- pnpm
npx playwright test --shard=1/3
yarn playwright test --shard=1/3
pnpm exec playwright test --shard=1/3
Productivity tips
Use Soft assertions
If your test fails, Playwright will give you an error message showing what part of the test failed which you can see either in VS Code, the terminal, the HTML report, or the trace viewer. However, you can also use soft assertions. These do not immediately terminate the test execution, but rather compile and display a list of failed assertions once the test ended.
// Make a few checks that will not stop the test when failed...
await expect.soft(page.getByTestId('status')).toHaveText('Success');

// ... and continue the test to check more things.
await page.getByRole('link', { name: 'next page' }).click();